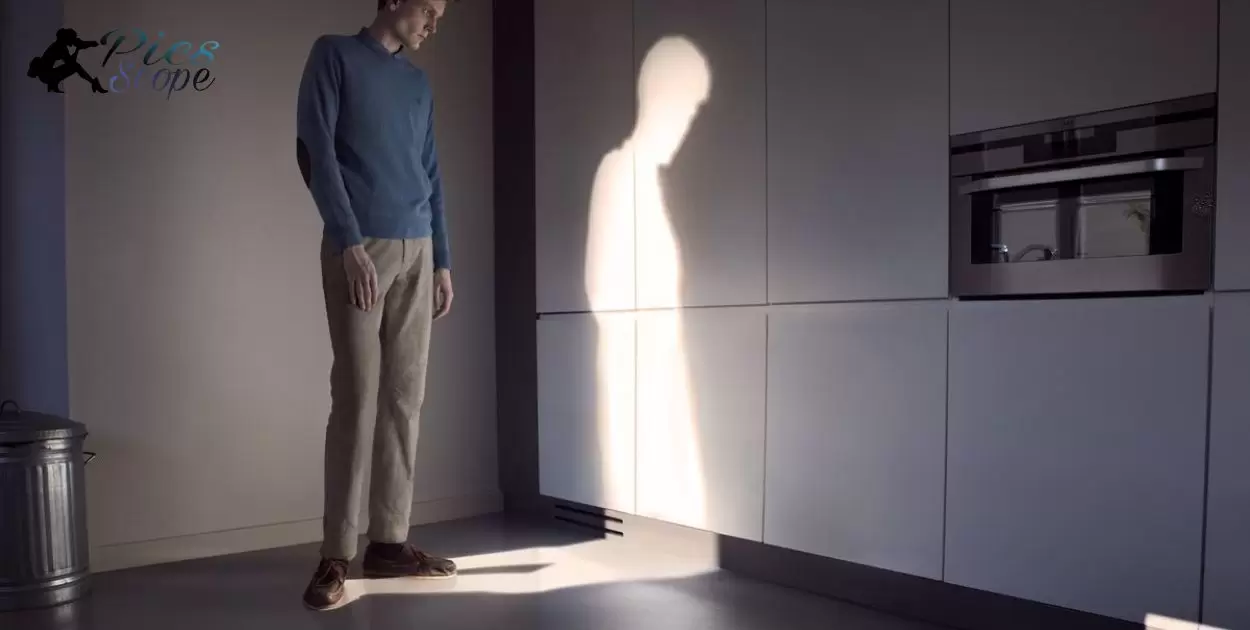
Shadows in indoor photography refer to the darker areas created when light is obstructed or blocked by objects, adding depth and dimension to the composition. Skillful management of shadows can enhance the mood and visual interest of indoor photos by playing with contrast and highlighting specific elements within the frame.
Discover the secrets to capturing flawless indoor shots by mastering the art of shadow control! Uncover valuable tips on “How to Avoid Shadows in Indoor Photography” and transform your images from ordinary to extraordinary. Elevate your photography skills today – banish shadows and illuminate your creative potential!
To minimize shadows in indoor photography, position your subject near natural light sources, like windows, to create even illumination. Additionally, use reflective surfaces or bounce flash to fill in shadows and achieve a well-lit image.
How To Eliminate Shadows With Lighting
Creating shadow-free spaces is easy with proper lighting. Position light sources strategically to minimize shadows. Use overhead lighting or multiple light angles for a well-lit environment.
Experiment with different light intensities and placements. Direct light towards walls or ceilings to diffuse shadows. By mastering lighting techniques, you can eliminate unwanted shadows and enhance the overall brightness of any space.
Understanding the Impact of Shadows
Shadows in photography play a crucial role in shaping the mood and atmosphere of an image. By skillfully incorporating shadows, photographers can enhance the depth and dimension of their photos. These contrasting areas of darkness and light contribute to the visual storytelling, creating a captivating and dynamic visual experience for the viewer.
Shadows add a sense of realism and authenticity to photographs. They highlight textures, reveal details, and bring a natural play of light to the composition. Mastering the use of shadows allows photographers to evoke emotions and convey a narrative, making it a key element in creating powerful and compelling images.
Optimal Lighting Conditions for Indoor Photography
Good indoor photography requires optimal lighting conditions. Choose natural light sources like windows during daylight for soft and flattering results. Position your subject near the light source to minimize shadows and capture vibrant, well-lit images.
In addition to natural light, consider using artificial lighting strategically. Experiment with adjustable lamps to control intensity and direction, avoiding harsh shadows. By mastering indoor lighting, you can enhance the quality of your photos and achieve professional-looking results.
Choosing the Right Light Sources
When picking light sources for photography, consider natural light from the sun. Position your subject to capture soft, flattering sunlight for a pleasing effect. Additionally, experiment with artificial lighting like LED or studio lights to control and enhance the overall look of your photos.
It’s crucial to understand the characteristics of different light sources. Natural light provides warmth and authenticity, while artificial lights offer versatility and consistency. By mastering the art of choosing the right light sources, you can elevate your photography and capture stunning images with the perfect illumination.
Utilizing Natural Light Effectively
In photography, using natural light effectively is key to capturing stunning images. Position yourself so that the sunlight enhances your subject without creating harsh shadows. Experiment with different angles and times of day to find the optimal conditions for showcasing the beauty of your subjects.
Natural light adds warmth and authenticity to your photos, creating a more natural and pleasing look. By understanding how to harness the power of sunlight, you can elevate your photography skills and produce visually compelling images that resonate with viewers.
How To Take Picture Without Shadow On Iphone
To capture shadow-free photos on your iPhone, position the subject in well-lit areas with even lighting. Avoid harsh sunlight or strong artificial lights that can create unwanted shadows. Additionally, tap and hold on the brightest part of the screen to ensure the camera adjusts its focus and exposure, reducing the chances of shadows in your picture.
Experiment with different angles to find the optimal position for your subject. Utilize the HDR (High Dynamic Range) feature on your iPhone to balance exposure in challenging lighting conditions. By following these simple steps and being mindful of lighting, you can take clear and shadow-free pictures with your iPhone.
Positioning Your Subject in Relation to Light
When taking photos, consider how light interacts with your subject. Place your subject strategically in relation to the light source for compelling results. Experiment with different angles and observe how light enhances the details and mood of your photographs.
Understanding the impact of light on your subject is crucial in photography. Directing light onto your subject creatively adds depth and highlights key features. By actively positioning your subject in relation to the light, you can capture visually striking and well-lit images.
Using Reflectors to Fill in Shadows
Photographers enhance their photos by using reflectors to reduce shadows. These simple tools bounce light onto the subject, creating a well-lit and balanced image. Reflectors are versatile, easy to use, and play a crucial role in achieving professional-looking photographs.
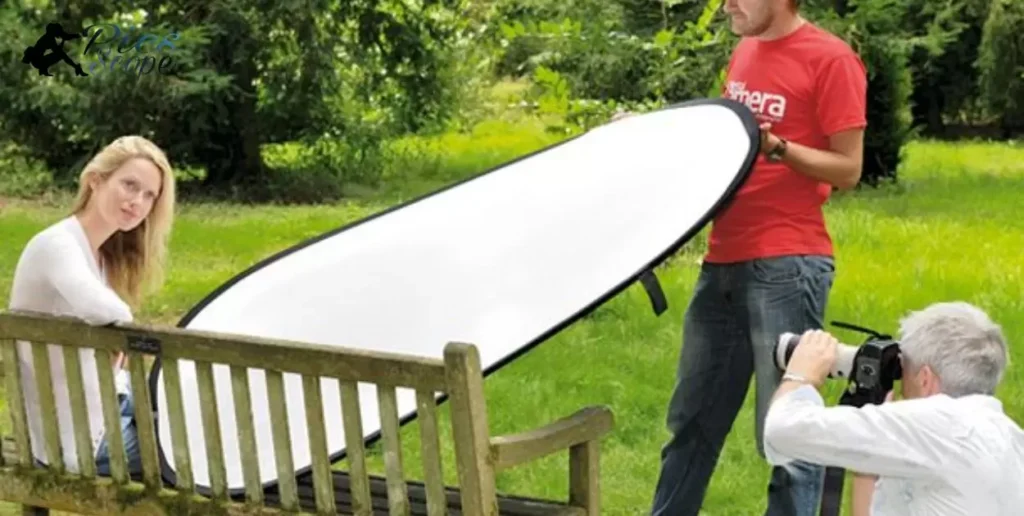
In outdoor settings, reflectors prove especially helpful. By strategically positioning them, photographers can manipulate natural light, eliminating harsh shadows and highlighting important details. Capturing portraits or nature scenes, the judicious use of reflectors elevates the overall quality of the photograph by ensuring a pleasing and evenly illuminated composition.
Softening Harsh Shadows with Diffusers
In photography, diffusers are essential tools for reducing harsh shadows. They work by spreading and softening the light, creating a more flattering and even illumination on the subject. Photographers use diffusers to achieve a natural and gentle look, especially in outdoor settings where sunlight can create strong contrasts.
By placing a diffuser between the light source and the subject, photographers can soften the shadows without losing important details. This technique is widely employed in portrait photography to enhance the overall quality of the image, resulting in a more pleasing and professional final product.
Balancing Ambient Light with Flash Photography
Achieving great photos means finding the right balance between ambient light and flash. When taking pictures, consider the natural light around you. Adjust your camera settings to capture the ambient light, ensuring a well-lit and natural-looking scene.
Introduce flash strategically to fill in shadows or add highlights. This way, you enhance your photos without overpowering the existing lighting. Mastering the art of balancing ambient light and flash photography will elevate your images, creating a harmonious blend of natural and artificial illumination.
Adjusting Camera Settings for Low-Light Conditions
To capture great low-light photos, set your camera for optimal performance. Begin by adjusting the ISO settings to a higher value, like 800 or above, to enhance sensitivity to light. Next, widen the aperture to allow more light into the lens, opting for a lower f-number. Finally, decrease the shutter speed to let in more light while avoiding camera shake.
Consider using a tripod for stability and preventing blurry shots at slower shutter speeds. Experiment with these settings to find the perfect balance for your low-light conditions, ensuring your photos turn out clear and well-exposed. Mastering these adjustments will enhance your photography skills in challenging lighting situations.
How To Eliminate Shadows In Product Photography
To remove shadows in product photography, position your light source strategically. Place it at a 45-degree angle to the subject, ensuring even illumination. This simple adjustment minimizes shadows and highlights product details effectively.
“Shadows In Outdoor Photography can present challenges, but with the right techniques, you can achieve stunning results. Consider using a reflector to bounce light onto the shadowed areas. This technique further reduces unwanted shadows, creating a well-lit and professional-looking product image. By mastering these basic lighting principles, you can enhance your product photography and showcase your items with clarity and vibrancy.”
Exploring Different Angles for Better Lighting
Capturing great photos involves mastering lighting techniques. Experiment with various angles to discover the best way to illuminate your subjects. This hands-on approach helps you develop a keen eye for the interplay between light and shadows in your photography.
By exploring different angles, you enhance the visual appeal of your pictures. Take advantage of natural light sources and try shooting from above, below, or from the side to create dynamic and interesting compositions. This active exploration of lighting angles not only improves your photography skills but also adds a creative touch to your pictures, making them stand out.
Creating a DIY Photography Studio Setup
Setting up a DIY photography studio is simple. Begin by choosing a well-lit room with natural light. Position a white backdrop for clean shots. Add affordable studio lights for better illumination. Use tripods to stabilize your camera.
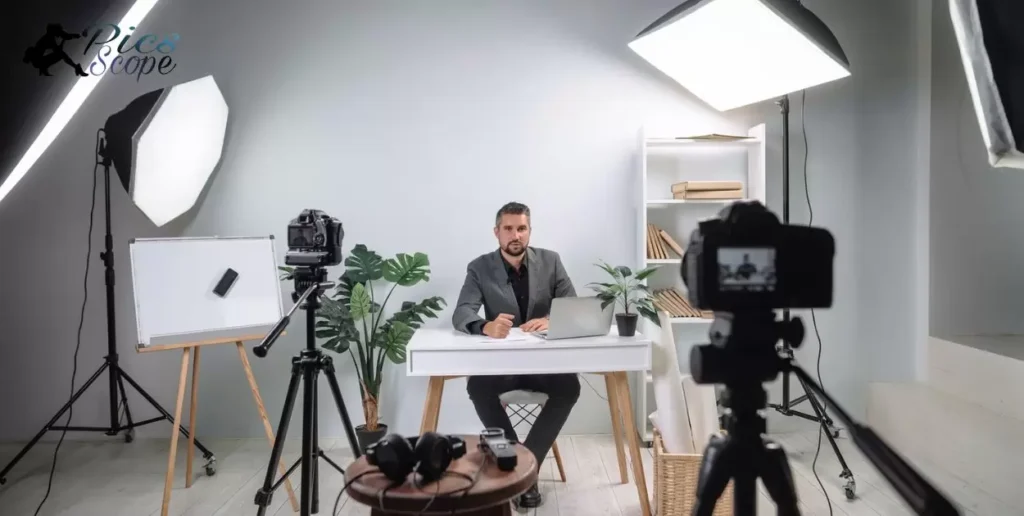
Next, gather essential equipment like a camera, tripod, and lenses. Experiment with different angles for diverse shots. Adjust lighting to enhance your subjects. With practice, your DIY studio will produce professional-looking photos. Enjoy capturing memories in your own creative space.
Minimizing Shadows Through Post-Processing
In photography, reducing shadows is crucial for enhancing image clarity. Post-processing techniques play a vital role in achieving this goal by adjusting light and contrast. Photographers can use software tools to minimize shadows, resulting in more vibrant and visually appealing pictures.
By employing specific editing tools, photographers can actively enhance their images. These tools allow them to control shadows, highlighting details and creating a balanced composition. In the world of photography, mastering post-processing skills becomes a key element in producing stunning visuals with minimized shadows.
Understanding the Role of White Balance
White balance is crucial in photography. It ensures accurate color representation in photos by adjusting for different light sources. Photographers use it to create natural and appealing images, making the subject’s colors look true to life.
To understand white balance, consider it as a way to maintain the right color temperature. When shooting in various lighting conditions, adjusting the white balance setting on your camera helps you capture the scene with accurate and pleasing colors. Mastering white balance enhances your photography skills and ensures your images reflect the true essence of the moment.
Avoiding Direct Light for Portrait Photography
In portrait photography, it’s crucial to steer clear of direct light. Harsh sunlight can create unflattering shadows and cause subjects to squint. Instead, opt for diffused or indirect light sources, like shaded areas or overcast skies, to achieve soft and even lighting. This enhances facial features and produces more flattering portraits.
By avoiding direct light, photographers can capture natural-looking portraits with a pleasing balance of highlights and shadows. This technique minimizes harsh contrasts, resulting in a more appealing and professional appearance.
Utilizing Multiple Light Sources Strategically
In photography, using multiple light sources strategically enhances the overall quality of your pictures. By placing lights strategically, photographers can control shadows, highlights, and create a well-balanced composition. This technique adds depth and dimension to photos, highlighting subjects and creating a visually appealing result.
Strategically positioning multiple light sources allows photographers to capture a scene with clarity and detail. Whether it’s studio photography or outdoor shoots, this approach empowers photographers to manipulate light effectively, resulting in vibrant and professional-looking images.
The Importance of Proper Room Lighting
- Enhanced Visibility: Proper room lighting in photography ensures better visibility of your subject, allowing you to capture details and nuances that might be lost in poorly lit conditions.
- True Color Representation: Adequate lighting helps in accurately representing colors in your photographs. This is crucial for maintaining the integrity of your subject’s colors without distortion.
- Reduced Shadows and Glare: Well-planned room lighting minimizes harsh shadows and glare, creating a balanced illumination that flatters your subject and provides a more pleasing aesthetic.
- Versatility in Style: Proper lighting provides photographers with the flexibility to experiment with different styles and moods. Whether it’s a bright and lively atmosphere or a dramatic, shadow-rich setting, room lighting allows for creative expression.
- Professional-Quality Results: Consistent and proper room lighting contributes to achieving professional-grade photographs. It ensures a polished look, making your images stand out with clarity, detail, and an overall high-quality finish.
Choosing the Right Photography Equipment
When picking photography gear, consider your needs. Look for a camera that suits your style and purpose. Pay attention to features like resolution and lens options. Additionally, select a sturdy tripod for stability.
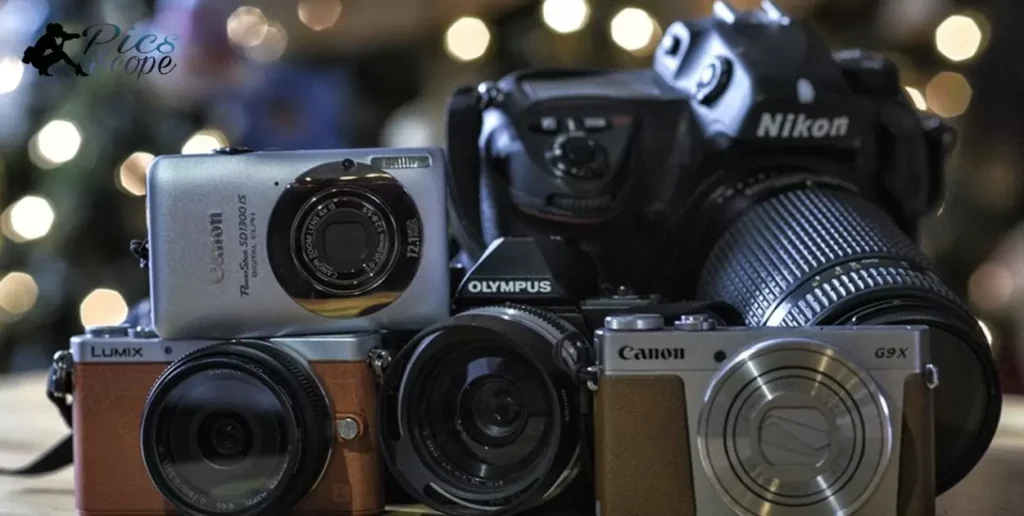
Investigate lighting options for better photos. Choose lenses that match your subjects. Don’t forget accessories like camera bags. With thoughtful choices, your photography equipment enhances your skills.
Experimenting with Light Modifiers
Photographers enhance their images by using light modifiers. These tools, like softboxes and reflectors, shape and control the intensity of light. Experimenting with these modifiers allows photographers to achieve diverse and captivating effects in their photography.
Light modifiers play a crucial role in the art of photography. They empower photographers to manipulate light, creating shadows, highlights, and textures. Through hands-on experimentation, photographers can unlock the full potential of these tools, adding depth and dimension to their visual storytelling.
Tips for Photographing Shiny or Reflective Surfaces
Here’s a simple table summarizing tips for photographing shiny or reflective surfaces:
| Tip Number | Photography Tip for Shiny/Reflective Surfaces |
| 1 | Use a polarizing filter to reduce reflections and glare. |
| 2 | Control the angle of light to minimize unwanted reflections. |
| 3 | Employ diffusers to soften harsh reflections on shiny surfaces. |
| 4 | Adjust your camera settings to capture details without overexposing highlights. |
| 5 | Consider shooting in manual mode for better control over exposure. |
| 6 | Use a lens hood to prevent lens flare caused by shiny surfaces. |
| 7 | Experiment with different angles and perspectives to find the best reflection-free shot. |
| 8 | Clean and polish reflective surfaces to enhance the overall image quality. |
| 9 | Use a lens with anti-reflective coatings for improved contrast and clarity. |
| 10 | Be mindful of your own reflection and position yourself strategically. |
These tips aim to help photographers capture stunning images when dealing with shiny or reflective surfaces.
Continuous Learning and Practice for Better Results
To improve your photography skills, engage in continuous learning and regular practice. Explore online tutorials, attend workshops, and absorb new techniques. Actively apply what you learn through consistent practice, as it is the key to achieving better results in photography.
Embrace hands-on experiences, experiment with various settings, and challenge yourself with different subjects. Stay curious, seek feedback, and analyze your work to identify areas for improvement. Remember, continuous learning coupled with dedicated practice is the formula for enhancing your photography skills and capturing stunning images.
How To Get Rid Of Shadows In Pictures
When dealing with shadows in pictures, a simple solution is adjusting your camera settings. Ensure there’s ample natural light to minimize shadows. Experiment with different angles and use the camera’s exposure compensation to get well-lit shots without unwanted shadows.
Editing tools also play a crucial role in shadow removal. Post-processing software like Photoshop or smartphone apps can help you lighten shadows or use the dodge tool. By understanding lighting and utilizing editing tools, you’ll capture shadow-free pictures effortlessly.
How To Take Photo Without Phone Shadow
To capture a photo without phone shadows, first, find a well-lit area with natural light. Position yourself so that the light source is behind you, eliminating any shadows cast by your phone. Hold the phone at an angle to the light, ensuring it doesn’t obstruct the light path, resulting in a clear and shadow-free shot.
Consider adjusting your phone’s settings, like brightness and exposure, to optimize the photo quality. Experiment with different angles and light sources until you achieve the desired effect. By being mindful of your surroundings and phone placement, you can take photos without the interference of unwanted shadows.
Frequently Asked Question
How do you remove shadows from indoor photos?
To remove shadows from indoor photos, use diffused lighting or bounce light off nearby surfaces. Adjusting the angle and intensity of light helps eliminate unwanted shadows and enhances photo quality.
How do you take overhead photos without shadows?
To capture overhead photos without shadows, position your light source directly above the subject and adjust angles to minimize shadows. Utilize natural light or external lighting to enhance the overall quality of the shot.
How do you mimic sunlight indoors photography?
To mimic sunlight indoors for photography, use bright, natural-colored lights positioned at different angles to create shadows and depth similar to natural sunlight. Adjust the light intensity and color temperature to achieve a warm and realistic indoor sunlight effect.
How do you replicate natural light indoors?
To replicate natural light indoors, use bright, white light bulbs and position them strategically to mimic sunlight.
How do you make indirect sunlight indoors?
To create indirect sunlight indoors, position mirrors or reflective surfaces near windows to bounce natural light into the room, avoiding direct exposure. This technique diffuses light, providing a softer and more evenly distributed illumination.
Conclusion
Mastering the art of indoor photography requires a keen awareness of light and shadows. By strategically placing light sources and adjusting angles, one can easily avoid unwanted shadows in their shots.
Experimenting with the positioning of both natural and artificial light, photographers can create a well-lit environment that minimizes the impact of shadows on their subjects. Remember, the key to successful indoor photography lies in understanding how to manipulate light effectively and employing techniques that bring out the best in every capture.