Good photos taken with a digital camera are clear pictures with proper lighting and composition. A good photo shows details and colors accurately. It also draws attention with an interesting subject or moment captured.
How does one take such quality pictures? The question “How To Take Good Photos With A Digital Camera?” has an interesting answer. With some simple tips and tricks, even beginners can improve their photography skills.
There are several easy things to keep in mind when taking photos with a digital camera. Some include choosing the right settings, holding the camera steady, and focusing on the important parts of the scene. Knowing a few basics can go a long way in taking memorable pictures.
Choosing The Right Photography Settings
There are several key settings that photographers use to take quality photos. The aperture, shutter speed, and ISO are important basic settings. It is best to understand how each works individually before using them together. The photographer should experiment with different combinations to see what works best for the desired result.
Aperture controls depth of field while shutter speed controls motion. A wider aperture like f/2.8 gives a shallow depth of field while a smaller aperture like f/16 gives more of the scene in focus. Faster shutter speeds like 1/500 second freeze motion whereas slower speeds like 1/30 allow for blur.
ISO is the camera’s sensitivity – higher ISO means more grain but allows faster shutter or smaller aperture in low light. Starting with auto mode can help understand how settings impact the photo before switching to manual.
Settings Are Best For Different Lighting Conditions
For bright outdoor lighting, use a medium to small aperture, fast shutter speed, and lower ISO. This allows less light in while freezing any movement. Indoor lighting may require wider aperture, slower speed, and higher ISO to compensate for less light.
Low light situations want the widest aperture possible, lowest shutter speed that stops motion, and highest ISO the camera allows with minimal grain. Understanding different lighting helps choose the right combination of settings for the desired photo.
Different scenarios demand different settings approaches. Adjusting settings to suit lighting is key for great photos.
Indoor Photography Settings
5 easy short sentences about indoor photography settings
- Use a higher ISO for more light in low-lit indoor shots.
- Open your aperture wide to let more light into indoor pictures.
- Set a faster shutter speed if shooting moving subjects indoors.
- Mount your camera on a tripod to keep it steady without indoor light.
- Bounce flash off ceilings to softly lighten indoor photos.
Outdoor Photography Settings
When shooting outdoors, there is generally much more available light. Shutters can be faster, apertures smaller, and ISOs lower. On sunny days, shutter speeds of 1/500 or quicker can freeze action. Smaller apertures of f/8 to f/16 give sharp focus throughout the frame.
Cloudy days may require adjustments like wider apertures and higher ISOs. Use fill flash when the subject is backlit by the sun. Be mindful of light sources that cause glare and shadows. Outdoor settings take advantage of having lots of accessible light when possible for clean-looking photos.
Low Light Photography Settings
For low light photos, open up the aperture as wide as possible to let more light in, Is Digital Photography As such as f/2.8. Boost the ISO to the camera’s highest setting. Handhold Ability determines the shutter speed – no slower than reciprocal of focal length to avoid blur. A tripod allows very long exposures over 30 seconds.
Focus manually if auto focus struggles. Use a flashlight or phone light creatively for illumination and interesting catch lights. Pay close attention to white balance which will likely need to be manually set. Settings in low ambient light require pushing cameras to their limits to get usable shots.
Action Photography Settings
Action shots demand fast shutter speeds, typically 1/500 second or faster to freeze motion cleanly. Autofocus modes like AI Servo track moving subjects. Switch lenses to ones with fast maximum apertures like f/2.8 for low depth of field.
Continuous drive or burst mode fires off shots in quick succession. Use a fast enough shutter speed that moving subjects look still but has some surrounding context in focus too. Make settings optimize speed and accuracy over image quality if needed. Action photography is all about capturing split-second moments.
Mastering Photography Composition
The placement and arrangement of objects within an image’s frame strongly impacts the photo’s look and storytelling ability. Where elements are situated can make or break a shot, regardless of technical quality. Composition guides viewers’ eyes in a way that engages them. It is a learnable set of techniques.
A photo’s subject matter means nothing if not presented compellingly. Leading lines, rule of thirds, framing and negative space usage are fundamentals that shape how viewers perceive an image. Composition skills develop over time, aided by analyzing other art. With practice, photographers learn to craft photos people want to look at.
Composition Make Or Break A Photo
A well composed photo draws people in while a poorly arranged one leaves viewers uncertain of its focus or meaning. Positioning elements off-center as opposed to directly in the middle makes shots more engaging. Leaving space around a subject for it to look into adds drama. Excess clutter is distracting – removing extraneous objects lets the intended subjects stand out more prominently. Photos with strong compositions retain viewers’ attention whereas weak designs bore people quickly.
Following basic compositional guidelines like the rule of thirds rarely results in unappealing photos. But composition is an artistic skill refined over years, not a checkbox. Photographers able to break conventional rules purposefully for impact have transcended composition fundamentals into a strength of their own vision.
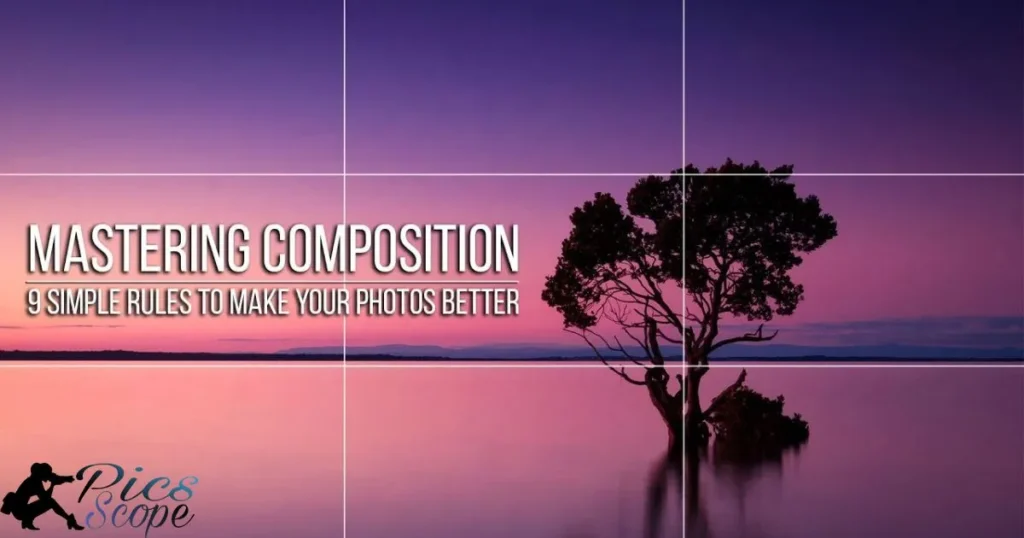
The Rule Of Thirds
One helpful composition guideline is called the rule of thirds. It suggests dividing an image using an imaginary 3×3 grid and positioning key elements like horizons, subjects and foreground objects along the lines or their intersections. Striking this balance prevents subjects from being right in the center, which viewers’ eyes typically avoid. Images composed with the rule of thirds appear more harmonious and intriguing.
Not all strong photos strictly follow the rule – successful compositions sometimes break guidelines. But for those still building skills, applying concepts like it offers a starting point for learning visual balance points. Snapshots done with awareness of the technique tend to look more purposeful than those without such forethought about composition.
Leading Lines
Leading lines refer to any elements in a frame that guide the eye towards the subject or focal point. Diagonal lines are generally most effective as they create a sense of directional movement. Lines can be literal like roadways, fences or streams, or more subtle using changes in texture or borders between colors/tones. Leading the eye makes what the photographer wants viewers to see immediately clear.
Curved lines can also act as leads if they direct focus to the main subject. Effective use of leading sight paths engages viewers promptly rather than leaving them uncertain where to look. Whether obvious or subtle, strong compositions employ guidance toward the photo’s central point of interest.
Framing Your Subject
Framing describes using other objects in an image to create a border or window around the subject. Natural frames like trees or architectural doorways work well, as do less literal edges such as a horizon or foreground grass. Good framing draws extra attention to what falls within the enclosed shape it forms while also giving context. Viewers perceive the framed portion as especially meaningful.
Framing works best when it is not too tight or loose. Too confined and other parts feel cut off, too open leaves the subject undefined. Finding that ideal balance distinguishes intentional framing from an accidental background. It adds another dimension of visual appeal and storytelling importance to the main point of focus.
Showing Negative Space
Negative space, also called whitespace, refers to areas of an image not taken up by the explicit subject. Well utilized negative space adds breathing room, lets subjects look as if comfortably positioned, and creates a sense of visual interest across the entire frame. Boring snapshots cram things together with no margin whereas more artful photos make great use of open areas.
Too much negative space risks appearing empty, so photographers must judge the right equilibrium for each shot. Subtle negative space usage enhances clarity on the main focus while excessive amounts take away from impact. Ultimately, showing whitespace where fitting contributes subliminally to photos that engage and satisfyingly fulfill viewers’ eyes.
Improving Your Photography Techniques
There are many photography techniques that can elevate pictures. The basics include using equipment properly and understanding core camera settings. Go beyond automatic mode by learning to adjust aperture, shutter speed and ISO manually for different light. Have patience shooting in tricky conditions and review results to see techniques that give keeper photos.
Steady equipment, stable positioning, careful settings and focusing all contribute to sharp photos. Practicing techniques consistently leads to better understanding of what creates compelling shots. Experimentation is key to improving technique and finding a personal style.
Techniques Can Help Improve My Photos
| Technique | Description |
| Using a tripod | A tripod provides steady support for sharp photos. |
| Adjusting camera settings | Learning settings lets you control photos more. |
| Minimizing camera shake | Hold steady to avoid blurry pictures. |
| Manual focus | Focus carefully for special effects. |
| Simple editing | Cropping out distractions makes photos better. |
| Adjust exposure | Make pictures lighter or darker if needed. |
| Adjust colors | Bring out colors to make photos more lively. |
| Reduce noise | Cleanup gives smooth pictures from high ISO. |
| Sharpen details | Enhance clarity where details washed out. |
| Apply lighting filters | Add warmth or atmosphere creatively. |
| Experimenting | Try new things to find your photography style. |
| Learning fundamentals | Strengthen basic skills over time. |
| Getting feedback | Others can spot ways to improve your photos. |
| Drawing inspiration | Look to talented photographers for ideas. |
| Taking many photos | Practice helps you spot your own progress. |
Using A Tripod For Stability
A tripod provides stability and allows steady, shake-free shots. This lets using slower shutter speeds for blurring movement, extreme zooming, or long exposures. Mounting the camera securely on a tripod eliminates unexpected jiggles and jostles. Tripods also enable precise camera positioning at different heights or angles.
Lightweight, compact travel tripods work for snapshots on the go. Heavier duty tripods suit working with large DSLR cameras and lenses meant for landscape, macro or night photography use cases requiring ultimate steadiness.
Adjusting Your Camera Settings
Learning photography basics like how aperture, shutter speed and ISO work individually allows combining them creatively. Aperture sets depth of field while shutter speed controls movement. ISO makes the image sensor more sensitive in low light at the cost of increased noise. Understanding these core settings unlocks taking better photos in many conditions.
Playing with settings manually teaches their impacts on shots. Memorizing “rules of thumb” starting points also helps get fast images in new scenes. With experience comes instinctively knowing the right settings for situations.
Minimizing Camera Shake
Using steady techniques can eliminate blur caused by slight hand movements during exposure. Bracing arms and elbows firmly aids holding a camera still. Turning on image stabilization in lenses and cameras helps too.
For snapshots without a tripod, lean against something solid or rest the camera on a steady surface. Set shutter speeds quicker than what would typically require a tripod given the lens focal length used. Avoiding camera shake is key for routinely sharp photos.
Focusing Manually Vs. Auto Focus
Auto focus conveniently captures most conventional shots but manual focus brings benefits. It allows precise adjustments for highly selective focus effects. AF can easily hunt or miss in low contrast areas whereas eyes detect sharpness faster.
Knowing a lens’ focus scale makes critical situations like fast-moving subjects or low light easier. While auto focus suffices for many photos, mastering manual focus opens doors to new types of images. Both have their time and place in a photographer’s skills.
Editing And Enhancing Your Digital Photographs
Even basic photo editing can improve pictures after the shutter clicks. Small tweaks like cropping out distractions, adjusting tone curves or reducing noise polish photos up. While raw skill behind the viewfinder is important, digital post-production also deserves attention to fully realize a photographer’s intent.
There’s no need to extensively edit casual snapshots, but for photos meant to impress, some computer optimization makes a difference. Learning simple editing broadens the abilities to create precisely the photo envisioned, rather than being limited by what came straight from the camera.
Be Done In Post-Processing To Improve Photos
Editing handles fine-tuning pictures through cropping, exposure adjustments, color correction and other enhancements. Simple operations like cropping out unwanted elements tighten composition. Increasing saturation brings dull shots to life while simultaneously preventing over-processing.
Post-processing gives control over aspects not fully determinable in the field. Whether batch-editing large numbers of photos or meticulously refining individual prized shots, editing rounds out the technical and creative process.
Cropping And Straightening Photos
Even slight cropping removes distracting elements or improves pictures’ visual impact. Crooked horizons or framing can also be fixed digitally through leveling.
Basic photo editing programs let adjusting a crop tightly on the intended subject or scene. Straightening ensures all details receive equal attention, fixing unintended skewed perspectives and making photos more pleasing to the eye.
Adjusting Color, Brightness And Contrast
Most photos straight from the camera require some color or tone adjustments for the best look. Simple moves like brightening shadows or deepening blacks with contrast/curves bring scenes to life realistically.
Small shifts towards warmer or cooler white balance also often mimic human perception better. Overdoing it crosses into unnatural territory, so restraint serves natural-looking results. Minor adjustments make images pop without looking over-processed.
Reducing Noise And Sharpening Details
High ISO shots often contain visual noise that post-processing cleans up. Noise reduction smooths but avoids blurring details. Sharpening then brings back crispness to elements like edges softened by reduction.
Finding the right balance between these steps ensures imagery appears clean without appearing over-processed. Software makes light work of subtle optimization that otherwise requires intensive labor by hand.
Applying Photo Filters
Simple built-in filters mimic popular lens effects to creatively transform mood. Warming filters lend an aged, nostalgic tone while cooling ones convey crispness.
Filters should avoid looking like overt digital manipulation. Used tastefully, they impart subtle ambiance enhancing the subject without distraction. Post-processing lets bringing ephemeral visions to pleasing photographic reality.
Growing Your Photography Skills Over Time

Progress takes effort over many shoots, honest self-critique and by learning from others. Getting out with a camera often expands skills in time. Visit exhibits of great photographers for inspiration too. Joining photography groups fosters meeting kindred creatives for tips.
While natural talents impact any art, dedicated study and practice strengthen technique independent of innate gifts. Continually challenging oneself with new photographic themes and techniques guards against staleness. Success stems from passion, perseverance and lifelong learning in photography.
I Continue Improving As A Photographer
Actively analyzing what makes photos appealing keeps an eye toward progress. Compare early and recent shots for technical and compositional growth. Study photos that inspire, dissecting masters’ strengths.
Taking varied types of photos, from portraits to landscapes to close-ups, rounds out skills. Reading books and online articles fuels new ideas. Experiment fearlessly and don’t hesitate to retry when things don’t pan out. Continuous self-betterment remains any dedicated photographer’s goal.
Learning Photography Fundamentals
Never stop strengthening basics like composition, exposure, lighting and more. Revisit guidebooks to cement understanding of these cornerstones. Photography workshops taught by experts augment solitary learning with valuable critiques.
Digital lessons through apps or online courses provide structured fundamental education too. Strong foundations birth mastery, so constantly brushing up on principles leads to fluid shooting ability in any conditions.
Experimenting With New Compositions
Trying out fresh angles, perspectives and framing techniques exercises creativity. Leave the comfort zone to learn more. Photograph unfamiliar subjects to spark inventiveness too.
Taking the same scene with varied settings reveals options. Experimentation lets discovering wholly new skills and styles. There’s always more composition techniques to digest and apply.
Joining A Local Photography Club
Formed clubs provide chances to glean knowledge from others. Exchanging feedback and participating in events challenges and enlightens. Photowalks visit scenic areas to shoot together.
Clubs foster meeting mentors. Exhibiting or giving talks at club functions aids sharing expertise. They inspire taking photos to another level for passionate amateurs and pros alike.
Drawing Photo Inspiration From Others
Endlessly study top photographers online, in books and at exhibits. Analyzing masters’ styles cultivates the eye and ideas. Emulate works to understand techniques.
Social media connects worldwide for real-time inspiration too. Following photography hashtag trends sparks motivation. Gathering influences helps carving a unique artistic signature over the long haul. Lifelong inspiration fuels any medium.
Frequently Asked Question
What Settings Should I Use For Outdoor Daytime Shots?
Use a lower ISO, smaller aperture, and faster shutter speed to get sharp photos on sunny days.
How Can I Take Better Pictures Indoors?
Higher ISO, wider aperture, and flash can help brighten low-light indoor shots.
What’s The Best Way To Take Landscape Photos?
Look for interesting foreground elements, use a tripod, and focus on composition.
How Do I Capture Moving Subjects?
Select a high shutter speed to freeze action, switch to continuous shooting mode, and track focus on your subject.
What’s The Easiest Way To Improve My Photos?
Learning basic composition rules like framing, rule of thirds, and filling the frame can immediately upgrade pictures.
Conclusion
Mastering a few key techniques can greatly improve your digital photos. Always be mindful of the lighting conditions and choose settings like ISO, aperture, and shutter speed to best suit them. Be sure to focus properly whether manually or using auto focus. Above all, practice the fundamentals of composition – look for interesting angles, implement rules like the rule of thirds, and fill the frame with your subject.
With time and experience, you’ll learn how to anticipate shot opportunities and capture them at the perfect moment. Don’t be afraid to experiment as you continue growing your skills. Above all, remember that capturing memories or scenes that you find beautifully is what digital photography is all about. Following some basic guidelines will ensure you take fantastic photos to enjoy for years to come.