Taking professional pictures with a phone means capturing high quality images that are sharp, well lit and compositionally sound using only your smartphone camera. A professional photo looks like it was taken with an expensive DSLR camera but was actually shot with a phone.
Have you ever wondered how influencers and celebrities manage to take such wonderful photos of themselves, their food or scenic landscapes everywhere they go? The secret is they know how to take professional pictures with just their phone. With some simple tips and tricks, you too can take photos that are indistinguishable from professional photos taken with pricey equipment.
All you need are a few pointers on things like lighting, angles, filters and photo apps. Proper lighting is key to making photos pop. Built-in phones offer ways to adjust brightness and lighting effects. Choosing the right background and frame also impacts the shot. With practice anyone can learn phone photography techniques to improve pictures on the go.
Mastering Phone Photography
There are several techniques to master phone photography. With practice, you can take amazing photos with your phone camera. Learning basic skills like lighting and composition will improve your photos. Experimenting with different settings will help you understand your phone’s camera better.
The camera on your phone allows you to capture moments anywhere. With some simple tricks, you can get professional-looking shots without a fancy camera. Practice regularly and be patient with yourself. Over time, your phone photos will get better and better.
Camera Settings Are Best For Phone Photography
For photos during the day, use your phone’s automatic settings. Automatic mode chooses the appropriate settings without you having to adjust anything. It works well in most lighting situations and for casual photos.
For more control, switch to a manual mode if your phone has it. Options like adjusting focus, exposure, ISO and shutter speed let you tweak photos. Manual mode takes some experimenting but gives you more flexibility. Start on auto and switch to manual as you get comfortable.
Automatic Or Manual Mode
When first starting out, automatic mode is best. It selects settings so you can point and shoot without fussing over controls. Automatic works for screenshots or snapshots where quality isn’t critical.
As you gain experience, try manual mode. Having full control means you can intentionally set exposure or focus points. Manual lets you be creative and take your photos to the next level. It takes practice but pays off for artistic shots.
To Adjust Exposure, Focus And White Balance
Tinker with your phone’s settings to understand their effects. Exposure controls brightness – too low looks dark, too high is washed out. Focus sharpens subjects – tap the screen where you want sharpness.
White balance alters color tone – auto works most times but you can choose warmer or cooler tones. Learn basic fixes like tapping the screen to refocus when needed. Small tweaks make a difference in your pictures.
Practice adjusting these settings manually in different lighting. Take numerous photos testing small changes to exposure, focus or white balance. Reviewing them side-by-side trains your eye.
To Use Hdr Or Night Mode
For high-contrast scenes like landscapes with dark shadows, Baby Hospital Photography Salary turn on HDR (high dynamic range). It captures multiple shots at different exposures and merges them. HDR preserves shadows and highlights that may otherwise be lost.
In low light without a flash, switch to night mode if available. It combines several long exposure shots to gather more light without blur. Night mode reduces noise and produces sharper nighttime photos. It’s great for landscapes after dark or indoor scenes with inadequate lighting.
Utilizing Camera Filters
Phone cameras let you add filters that alter the look of photos. Filters mimic professional styles and effects. Popular ones like black and white or retro tones can turn ordinary shots into art.
Experiment with your phone’s different filter options. Some apply subtle changes while others radically transform colors or contrast. Filters are fun to play with but make sure the artistic effect matches your photo’s mood. Don’t overuse filters or apply them randomly.
Lighting Like A Pro

Proper lighting is key to great phone photos. On sunny days, position your subject with the sun at their back or angle their face toward the light source for a soft glow. Harsh direct sunlight creates harsh shadows and squints, so diffuse it with a tree or buildings.
Use lighting to enhance subjects and create flattering scenes. Soft lighting from windows or shadows adds dimension. Experiment with different lighting setups to appreciate lighting’s impact on phone pics. Reposition or wait for better natural lighting when needed.
Makes Good Photo Lighting For Phone Photography
Tip Sentence
- Opt for soft, indirect light. Harsh direct light like midday sun creates shadows – diffuse it with clouds, trees or indoors near windows.
- Face subjects towards the light. Have your subject turn their face so the light source is in front of them to illuminate features flatteringly.
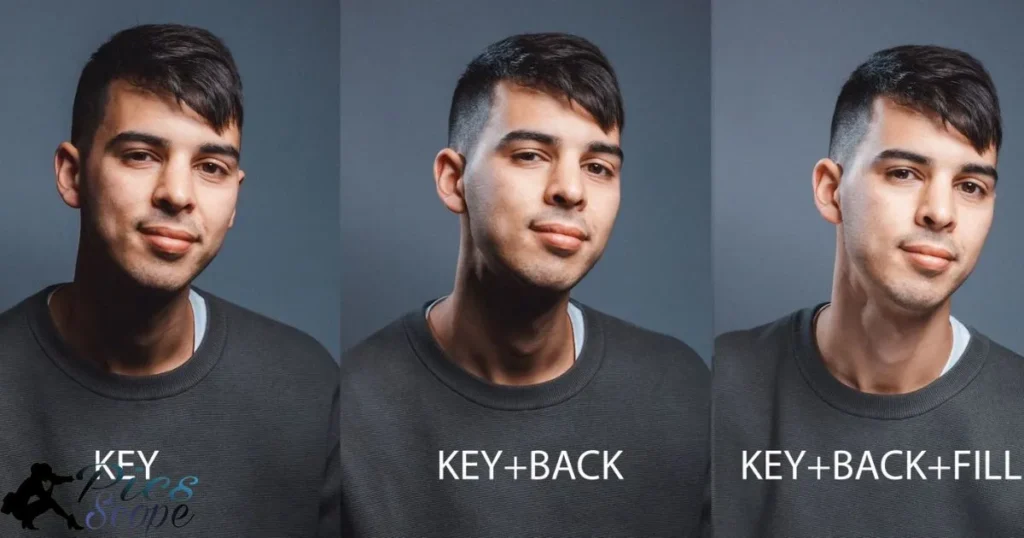
- Add fill with reflectors as needed. Use reflective surfaces like walls, cards or foils to bounce light back and fill in shadowy areas for balanced exposure.
- Adjust light angles for dimensions. Vary light directions to add shape and definition to subjects – front lighting can flatten faces.
- Consider lighting color temperature. Natural light is most flattering but LED or indoor bulbs have a color cast – adjust balance in editing if possible.
Indoor Or Outdoor: Where’s The Best Light
Outdoors often has the best natural light due to openness and daytime sun. Seek open shade under trees on bright afternoons for soft yet substantial lighting. Just after sunrise or before sunset provide warm, flattering tones as well.
Well-lit rooms typically offer good light for indoor shots. Near windows, lighting mimics outdoors. Overcast days replicate this diffuse lighting indoors too. Avoid poorly lit interiors or relying solely on flash which creates harsh lighting.
Using Natural Light For Portraits
Position subjects near a window on a bright day for warm, even lighting. Have them angle their face toward the light for an appealingglow. In open shade, diffuse sunlight creates shadows adding depth. Avoid harsh direct sun which causes squinting and highlights imperfections.
Play with various angles and have the person turn their head to find the most flattering light. Natural light emphasizes beauty when used skillfully. Review shots right away to confirm lighting looks soft, balanced and suits the subject’s features.
Adding Light With Flash Or Reflectors
A phone’s built-in flash brightens close-up shots but creates hard shadows. Bouncing the flash off a ceiling or wall spreads light more evenly. Reflectors subtly enhance existing light without adding harshness. Aluminum foil, cardstock or white objects reflect light back onto faces from above, side or below.
Experiment positioning reflectors and bouncing the flash. Consider supplemental lighting for portraits or low light indoor shots. Add drama yet balance overall exposure and lighting quality with natural and fill sources.
Low Light Photography Tricks
In dim settings without flash, raise your phone’s ISO to allow more light into photos. Higher ISOs cause noise, so keep it as low as feasible while still achieving proper exposure. Using a tripod steadies shots of stationary subjects at slower shutter speeds too.
Consider night mode on phones equipped with it. Night modes use computer processing to combine multiple exposures into one bright, relatively blur-free image. Practice composing shots against lighting to bring out shadow details. Review photos immediately and retry with adjustments as necessary. Patience and steady hands pay off for low light photos.
Composition And Subject Matter
Strong composition makes your photos stand out. Carefully choose what to include in the frame based on the subject and mood. Look for interesting angles, spaces or gestures that capture viewers. Consider what backgrounds best complement the main focus. Simple, intentional compositions attract attention to key subjects.
Think about the story or feeling you want viewers to experience. Match your framing to express different emotions. Detailed compositions please eyes while abstract styles intrigue minds. Find impactful ways to depict people, places or ideas through artful phone shots.
Composition Improve Phone Photographs
5 quick tips to improve your phone photographs through composition
- Use the Rule of Thirds. Position your subject or area of focus along the imaginary gridlines that divide your frame into thirds for more visually appealing photos.
- Consider negative space. Leaving space around your subject prevents photos from looking too crowded or cluttered. Think about balancing empty and filled areas.
- Avoid centering subjects directly in the middle. Offsetting the subject makes compositions look more artistic and interesting to the eye.
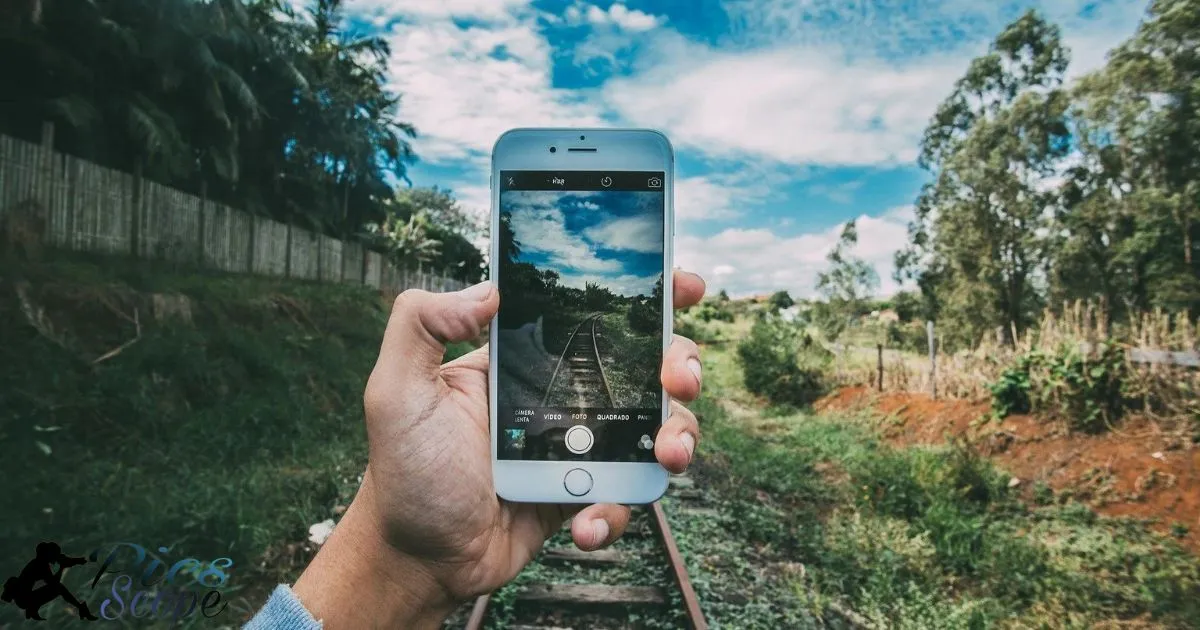
- Pay attention to leading lines. Elements like pathways, roads or currents can naturally guide the viewer’s eye through your photograph towards the main subject.
- Vary your perspective. Try switching between landscape and portrait orientations. Also take shots from above or below your subject to capture it from a unique angle.
Rule Of Thirds: Does It Apply To Phone Pics
Dividing shots neatly into thirds aids composition even on phone cameras. Position subjects or key areas along these intersecting lines for balanced appeal. Viewers’ eyes travel the frame naturally drawn to focal points arranged this way.
The Rule works well for landscapes, portraits and more. Yet breaking usual guidelines creates tension that pulls viewers in too. It depends on your scene – try different arrangements and see what feels most powerful. Intuition drives strong composition beyond set rules.
Choosing Flattering Angles
Find the most flattering viewpoint by experimenting with angles. Shoot above your subject for a smaller appearance or below for a bolder look. Side angles provide width while frontal views capture expression. Adjust perspective to alter how your subject appears.
Considering lighting, locate angles shielding faces from direct sun. Harsher lighting demands softer views than shaded spots. Review shots immediately to confirm angles enhance subjects’ beauty naturally. Flattering angles draw people into photos.
Framing And Focus: What To Exclude
Leave distractions out of tight compositions to direct attention. Rather than including all backdrop details, frame selectively to concentrate vision. Soft blurs behind primary subjects isolate focus there.
As with portraits, paying attention off-camera creates tension and mystique. Knowing what to highlight versus omit crafts striking visual narratives from simple phone photos. Purposeful exclusion strengthens inclusion.
Capturing Emotion With Expression And Body Language
Candid expressions and poses exude feeling that engage viewers. Catching laughter, curiosity or delight in people’s eyes draws you in. Accidental gestures reveal character, while intentional ones express moods.
Notice how subjects interact with environments too. Where they position themselves and what they touch show purpose. Psychological spaces between figures add intimacy layers. Learn to capture emotion through observation beyond just smiles.
Editing On-The-Go

Minor phone edits polish photos quickly. Straighten crooked shots,crop out distracting edges or fix over/underexposed areas. Brighten dim areas subtly or darken overpowering highlights seamlessly.
Basic fixes perfect social share shots. While advanced tools promise more, simple swipes often suffice. In-camera apps edit anywhere motivations strike, rather than waiting for full computers. Spontaneous tweaks capture fleeting moments freshly.
Phone Editing Apps Can Take Your Photos Further
Powerful editors rival computer software for dedicated mobile photographers. Lightroom CC and Snapseed offer advanced controls. Lightroom’s raw editing develops potentials while Snapseed’s focal tools selectively sharpen sections.
Enlight and VSCO fine-tune aesthetics through presets. Filters, effects and adjustments transform cell photos into artwork. Yet heavy crops or edits may degrade original quality over time with each save. Consider limitations before over-editing phone captures.
Basic Editing Tools In Camera Apps
Most phone cameras include filters, crop/rotate and simple enhancers. Filters simulate film looks, textures or effects. Cropping emphasizes compositions while rotation straightens tilts.
Basic editing boosts exposure, contrasts, warmth or fills light areas. These effortless fixes perfect normal shots on-the-go. Social media dimensions auto-apply for consistent sizing too. Camera apps empower street moments’ potential through swift tweaks.
Advanced Editing With Third Party Apps
More robust editors like Lightroom or Snapseed recreate desktop Darkroom tools. Precise sliders tailor exposures, colors, curves and tones. Selective focus tools highlight focal areas attractively.
Healing brush and spot tools remove blemishes or irregularities seamlessly. Presets dramatically transform ambiences through moods and styles. Third-party apps polish cell pics into fine-art photographs.
Filters, Effects And Styles For Mood And Visual Interest
Creative filters abstract reality into styles evoking different feelings. Black and whites elicit nostalgia. Grunge applies urban grit while Lomo simulations denote playfulness.
Effects like lens blur, vignettes, textures and glows enhance aesthetics or direct attention. Well-applied looks complement subjects’ essences. Exploring various styles teaches how transformative filters can beautify standard shots into memorable visual stories. Subtlety outweighs overuse.
Cropping, Rotating And Other Composition Tweaks
Careful cropping refines compositions by eliminating unnecessary edges or areas. Rotating straightens tilting frames perfectly. Exposure adjustments rescue blown-out highlights or blocked shadows artfully.
Selective focus tools draw eyes to selective spots. Healing brushes and stamps wipe blemishes discreetly without traces. Text overlays or emojis decorate scenes for humor. Minor fixes elevate everyday moments through considered adjustments.
Sharing Your Mobile Photographer Works

Exhibit prized mobile photos on social networks, sites and personally. Instagram showcases creativity through geotags and hashtags. Facebook albums narrate personal visual journals while Pinterest inspires with idea boards.
Twitter shares photography short thoughts. Specialty networks like Flickr host serious portfolios. Physical prints adorn walls beautifully. Confidence sharing cell masterpieces inspires others and grows mobile artist voices to spread inspiration.
You Share And Show Off Your Best Phone Photos
Artful mobile photos captivate when shared creatively. Curate highlight reels on Instagram Stories with captions, stickers or music. Carefully crafted feed grids showcase artistic styles cohesively.
Facebook albums narrate visual stories or event documentation. Twitter shares quick tips, thoughts and full-resolution mobile works via links. Whether casual or portfolio style, confident showcasing spreads mobile photography joy.
Exporting And Saving Options
After editing, photos must be exported from apps. Camera roll saves JPEGs that degrade over edits but share readily online. Third-party photo apps export optimized PNGs or JPEGs for social networks without quality decline.
Save RAW files from apps like Lightroom to preserve editing flexibility long-term at the cost of large file sizes. Storage limitations necessitate backups or file offloading to computers. Properly exporting protects photo investments wherever shared.
Posting To Social Media Like A Pro
Thoughtful shares captivate audiences. Pay attention to image sizes, cropping, hashtags, descriptions and placement within feeds. Purposeful feeds showcase growth. Link full resolutions through services like Flickr to engage enthusiasts.
Engage through relevant comments yet avoid overposting. Follow similar photographers to spark conversations. Most networks reward quality over quantity so select best works representing your style. Promoting high-effort mobile photos spreads art and skills.
Creating Phone Photography Portfolios
Assemble cohesive collections showcasing strengths, themes or skills. Curated selections share through Flickr accounts, websites or printed books. Carefully chosen works attract clients, galleries or publishers notice.
Captions describe processing, intentions and background details. Consistent branding across platforms solidifies identity as a mobile photographer. Dedicated sharing channels highlight passion and attract supportive communities. Portfolios spread artistic visions professionally.
Licensing And Selling Phone Photos
Beyond selling prints, license phone photos for publications, products, ads or events. Stock photo sites connect with buyers while agents represent in marketplaces. Watermark all unlicensed shared images distinctly.
Understand licensing terms impacts uses and ensure agreements protect works appropriately. Receiving compensation validates mobile photography as credible art. Pursuing licenses and sales channels inspires mobile artists worldwide.
Frequently Asked Question
What settings should I use on my phone camera?
Use manual mode and adjust ISO, shutter speed, focus and exposure to have full control over the shot.
How can I improve my phone photos?
Pay attention to lighting, focus on composition with rules like thirds, and don’t be afraid to edit pictures to enhance colors and exposure.
What equipment helps boost phone photos?
External equipment like phone lenses, tripods, remote shutter releases and lights help stabilize shots and add professional quality and control.
How important is lighting for phone pics?
Lighting makes a huge difference – seek soft natural light and learn to use flash, reflectors and editing to improve lighting in pictures.
What photo styles translate best to phone cameras?
Portraiture, landscapes, macro photography, and architectural shots lend themselves well to the capabilities of phone cameras when using techniques like HDR and manual mode.
Conclusion
With some basic photo techniques and the right tools, you can capture high-quality images with your phone that are comparable to a professional camera. Taking time to learn composition, lighting, and camera controls will improve your photos significantly. While phone cameras may lack some technical specs of DSLRs, they are more than capable of producing stunning pictures when used skillfully.
Don’t forget that great photos start before even taking the shot. Be selective about your subject matter and think about interesting angles, backgrounds, and ways to showcase your vision. With practice and experimenting in manual mode, you’ll gain confidence composing unique shots that show off your growing skills as a mobile photographer.


